
AR-15 Triggers: The Full Guide & Troubleshooting
Posted by Gun Builders Depot on Jul 9th 2019
Building your first black rifle? In this guide, we're breaking down AR-15 triggers from start to finish. We'll explain how the standard trigger works, what types of triggers you can buy or upgrade with, and which is best for your own build's needs. Lastly, we'll go over how to troubleshoot your trigger assembly, including how to fix the dreaded AR-15 trigger reset failure that so many shooters deal with. Let's get started.
This piece is part of our Complete Parts Guide on Building an AR-15.
How the AR-15 Trigger Works
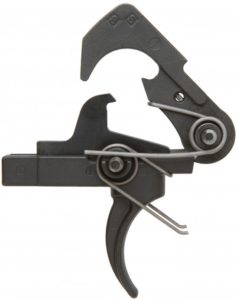
First, let's look at the original AR-15 trigger, identify its main components, and what they each do in order of operation. The trigger we're demonstrating below is a typical mil-spec, single-stage trigger currently at rest with the hammer cocked:
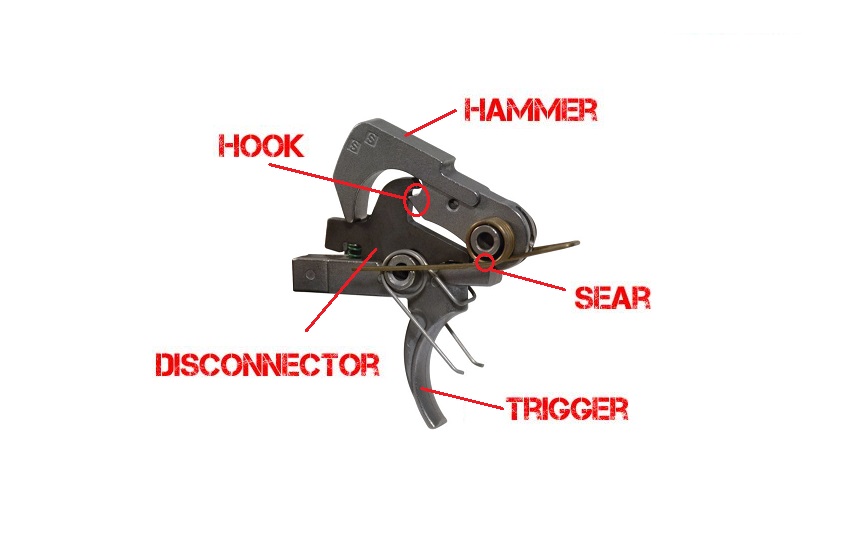
Trigger. The trigger is your "go" button. Pull it and your rifle or pistol will release the hammer, allowing it to fire a round if one's in the chamber.
Hammer. The hammer is the large, flat-faced piece of steel at the top of the trigger assembly. The hammer rotates up and down like a large lever. The face of the hammer strikes the firing pin inside the bolt carrier group, igniting the primer on a chambered round.

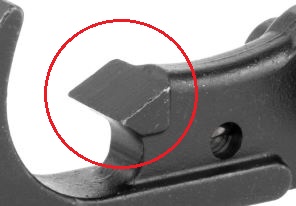
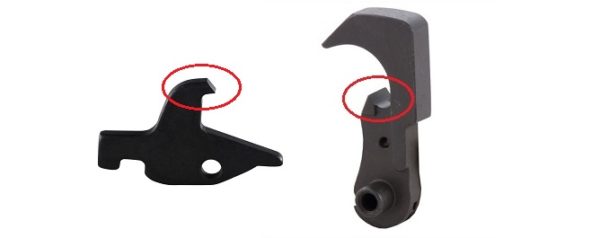
Sear. The sear is the portion of flat steel at the front of the trigger (circled) that keeps the hammer cocked until the trigger's pulled. A cut-out on the bottom of the hammer (circled) engages the sear while at rest. Pulling the trigger angles the sear downward and out of the hammer's cut-out, releasing it to strike the firing pin.
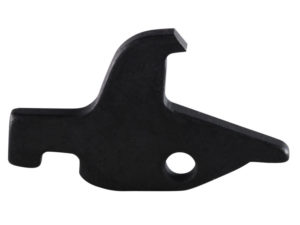
Disconnector. When a round is fired, the bolt carrier group is forced backwards into the buffer tube by the gas system. As the BCG rides backwards, it pushes the hammer back down into the trigger assembly. This is how the hammer gets back into position to be re-cocked for the next round.
The sear normally holds the hammer down when cocked. But since you pulled the trigger to fire a round, it's not in the right place at the right time. And no human shooter could release the trigger fast enough to get the sear in position before the hammer is forced back down by the BCG. So, to prevent the hammer from just de-cocking and flying back up on its own accord, the spring-loaded disconnector catches the hammer for you.
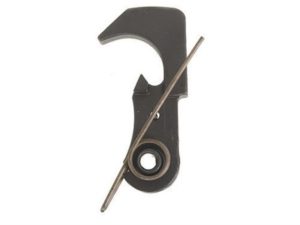
Hook. When the hammer is forced down by the BCG, the hook on the back of hammer temporarily catches the disconnector, preventing it from flying back up. As you release the trigger and allow it to return to its resting position, the sear moves back up to meet and cock the hammer. As the sear moves back into position, the disconnector slides off the hook. At this point, the hammer is now held by the sear and cocked, the trigger itself is reset, and you're ready to fire once again.
Trigger Definitions
Before we start discussing trigger types and what's best for you, it's important to learn some jargon. These are the things you should look out for when shopping for a trigger, doing research, or reading customer reviews:
Take-up refers to the slack you might feel when you start pulling on a trigger. A trigger exhibits some slack if you can pull on it and it starts moving before the sear begins moving away from the hammer. Basically, you're squeezing the trigger and nothing is happening yet.
The wall. If a trigger has any slack, the wall is the point at which slack is taken up and the sear begins moving away from the hammer with movement of the trigger itself. You'll know you've hit "the wall" when you begin to feel spring tension and resistance, and movement of the sear.
Creep is the movement of the trigger and sear up to the point of the hammer breaking loose and firing. Creep is often talked about negatively but it's not always a bad thing. If your trigger's creep is smooth and consistent, you'll have a predictable gun that'll let you master a good trigger squeeze. You could, however, feel a series of stops and starts while the trigger creeps. This is referred to as trigger stacking.
Stacking occurs when friction or resistance stops the trigger from creeping, requiring you to exert more force to make it move again. Stacking creates an unpredictable trigger pull and is something to be avoided.
Pre-travel is simply the combination of take-up, the wall, and creep. Pre-travel can be described as a measurement ("my trigger has around 1/8" of pre-travel").
Trigger break is the point at which the sear disconnects and the hammer snaps up, striking the firing pin.
Over-travel is the distance the trigger continues to travel after it breaks. More over-travel means trigger reset takes longer.
Types of AR-15 Triggers
The semi-auto function of the AR-15 is relatively simple, and it's allowed aftermarket trigger kits to flourish. Nowadays, there's a trigger out there for every type of shooter and budget.
Single-Stage Trigger
This is the O.G. trigger that Eugene Stoner designed. It's also the trigger you get with any standard lower parts kit. The single-stage trigger looks and functions exactly like what's described above. Almost every single service rifle and store-bought AR-15 uses a regular ole' single-stage trigger. Because of their simplicity, single-stage triggers are reliable and exhibit little to no take-up. Creep is minimal and consistent, and stacking is rarely an issue.
Mil-spec design
Most single-stage triggers are based on the M16's design. Military brass thought a light trigger pull (4 to 5 lbs.) would be dangerous, so most have a pull weight of 7 to 8.5 lbs. The latter is considered a mil-spec trigger weight.
Two-Stage Trigger
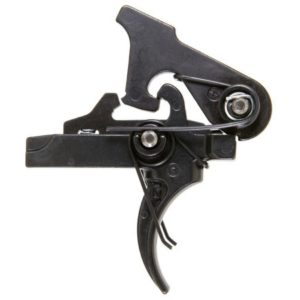
A heavy trigger can make achieving consistent accuracy a challenge. The more force you have to exert on the trigger, the more likely you are to pull your shots left or right and miss. But having an incredibly light trigger pull can be dangerous, so what's the solution? The two-stage trigger. A two-stage trigger feels like it has a little slack build in. Really, this is simply a custom disconnector and hammer with two hooks. Exampled above is a Geissele Two-Stage. The double disconnector hooks act as two points of contact before the hammer is released.
How it works
The slack you feel when you squeeze the trigger partially is an initial take-up, usually around 1.5 to 2 pounds. This disconnects the first of two hooks. Once slack is taken up, the trigger presents a slightly heavier "wall" (second disconnector hook) that breaks at around 2 to 2.5 pounds. At this point, you only need a tiny extra squeeze to break the hammer and take your shot. Two-stage triggers are great because they offer a sort of buffer zone. You can safely move your rifle around without fear of setting it off. But when the time comes, you have a predictable trigger squeeze that doesn't require much creep or force to break.
Binary Trigger
Binary triggers have been somewhat controversial. Some states have even banned them. A binary trigger (like this example from FosTech) is essentially a "double-tap" trigger: Squeeze the trigger, and one round fires. Release the trigger back to its resting position, and the hammer will release a second time, firing a second round. The benefit to this is a higher rate of fire, though shooters using a binary trigger will need to practice and get a feel for how the trigger "breaks" a second time, without a conventional trigger pull. Some binary triggers require the use of an M16/full-auto bolt carrier group (a binary trigger does not convert an AR-15 for full-auto fire).
Recommendations
Some binary triggers only allow for safe or binary function without a semi-automatic function. We recommend investing in a binary trigger that also affords semi-automatic fire for safety and practicality. Check your state and local laws before buying a binary trigger.
Drop-in Trigger
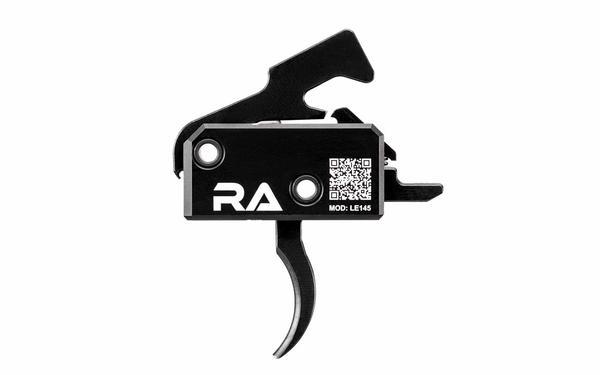
Drop-in triggers are hugely popular among many AR-15 owners. They're the easiest type of trigger to install, and they can be used in any rifle or pistol equipped with a standard lower parts kit. Drop-in triggers are self-contained units that include a custom trigger, sear, hammer, and springs. As the name implies, these units are pre-assembled and simply "drop in" to the lower receiver. This eliminates compatibility issues and the need for troubleshooting. Exampled is the LE145 Drop-in Trigger from Rise Armament.
To give you an example of just how good a drop-in fun button can be, the LE145 has a final tolerance of 0.000001 inches (that's one-millionth of an inch). The result is a trigger with no creep, take-up, stacking issues, or over-travel. For an easy trigger upgrade that's guaranteed to work, this is what we recommend above all else.
Compatibility
Some use their own pins, while others simply reuse the pins that came with your parts kit. Drop-in triggers can be binary, two-stage, or single. Some are adjustable, but only partially. These triggers are usually "tuned" at the factory, though some allow you to select pre-determined trigger weights by rotating a screw or spring.
Adjustable Trigger
Adjustable triggers can be binary, single-stage, or two-stage. Adjustable triggers are often marketed as "match-grade" and they allow you to fine-tune the weight of your trigger pull. Single-stage triggers benefit the most from adjustment and fine-tuning, allowing any shooter to achieve a single, crisp pull that's light and easy to control. Adjustable triggers can also eliminate stacking issues.
Troubleshooting Your Trigger
The black rifle market's flooded with tons of triggers and parts kits. With so many different brands and parts available, even a regular single-stage trigger can run into functionality issues. The most common issue shooters run into is the dreaded failure to reset. To confirm that you have a failure to reset, you need to perform a basic functions check:
With your weapon empty and on "SAFE", pull the charging handle to cock the hammer. Place the safety selector lever on "FIRE". Pull the trigger to the rear and hold. The hammer should fall. While still holding the trigger to the rear, pull the charging handle to the rear and release. Slowly release the trigger until you hear and feel an audible click or "popping" noise. This is the disconnector releasing the hammer hook as the trigger/sear grabs the hammer. Pull the trigger to the rear again. The hammer should fall.
If you don't hear a "pop" or the hammer doesn't fall a second time (the final trigger squeeze in the animation above), you have a failure to reset.
Fixing the AR-15 trigger reset failure
Don't pull your hair out just yet. Plenty of shooters have dealt with this issue. There are some quick ways to diagnose and fix a failure to reset:
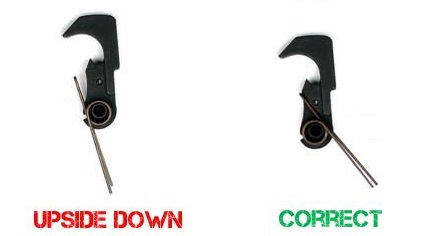
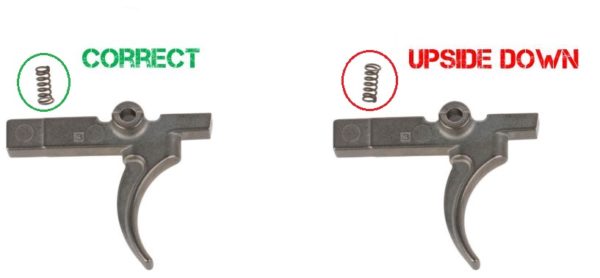
Check hammer and trigger springs. The hammer and trigger springs are directional and occasionally, they may be installed upside down. Check both springs to see if the coils are above the springs' legs, or below. The legs of both springs should be resting flat on the floor of the lower receiver. This gives preload to the coils, allowing them to control trigger and hammer tension.
Check disconnector spring. The disconnector spring is conical, with a large base and tapered end. The disconnector spring is very small, and it also can be installed incorrectly. Double-check that the large end of the spring is installed in the trigger, and the tapered end is seated underneath the notch in the disconnector.
Polish disconnector/hook. Brand-new hammer hooks and disconnectors can have microscopic burrs (gritty material) left over from manufacturing. These small burrs can cause the disconnector and hammer to hang on each other. If you've eliminated spring issues, a few light passes with some 1,000- or 800-grit sandpaper should remove any burrs on the disconnector and hammer.
CAUTION: Excessive polishing can round out the faces and edges of the disconnector and hammer. If this happens, it can cause your trigger assembly to fail completely. Take your time polishing. Check the hammer reset functionality while you polish and test-fire a few rounds if possible. Stop sanding once the disconnector and hammer start to cleanly separate. There is always a break-in period with new firearms, so we recommend putting at least 100 to 200 rounds through your new AR-15 to help work out any kinks.
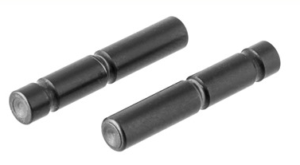
De-burr hammer and trigger pins. Burrs can also be present on your trigger and hammer pins. These pins need smooth surfaces to allow the hammer, trigger, and disconnector to rotate freely. With the receiver open and your thumb on the hammer, press it down to cock it and then squeeze the trigger. With your thumb still on the hammer, allow it to slowly rotate up and then press it back down, slowly. If you feel resistance or binding at any point, there are burrs on your pins.
Pin burrs can be worked out by manually cycling the trigger assembly and hammer as described above. If you're lucky, test-firing a few rounds can also help work out these kinks. Apply a generous amount of oil or lubricant to the trigger assembly and pins while you work them in. If binding is still present, you'll need to remove the trigger pins and lightly polish their surfaces.

Check disconnector and hammer tolerance. If all else fails, your disconnector may be out of spec. The distance between the hammer and disconnector hooks (with the trigger at rest and the sear holding the hammer) should measure 0.003". If this tolerance is too great, you'll need to replace your disconnector or lightly polish and remove some material from the front lower side of the disconnector, where it rests on the trigger.
To check tolerance, hold the trigger down and press down on the hammer. The hammer hook should engage the disconnector, preventing it from flying up. If the hammer misses the disconnector, your disconnector is to blame. If polishing the disconnector, be sure to re-measure your tolerances. If the tolerance gets too low (below 0.003"), you'll run into another failure to reset.
Conclusion
Whether you're buying or building your AR for the first time, or simply trying to upgrade with the right parts, this guide should offer everything you need to know about AR-15 triggers. If you need more help picking out parts, you're troubleshooting a trigger job, or you simply have more questions, give us a call or email us! We build our own rifles and pistols in our spare time and we're happy to help you set up your own."
DISCLAIMER: If you are new to the world of DIY gun building, you likely have a lot of questions and rightfully so. It’s an area that has a lot of questions that, without the correct answers, could have some serious implications. At GunBuilders.com, we are by no means providing this content on our website to serve as legal advice or legal counsel. We encourage each and every builder to perform their own research around their respective State laws as well as educating themselves on the Federal laws. When performing your own research, please be sure that you are getting your information from a reliable source.