How to Use MOA Reticles and Turrets
“This rifle shoots 1 MOA,” or “Your point of impact was 2 MOA right,
0.5 MOA high.” You’ve heard these things at the range, but what is MOA?
If you’re a new shooter then you’re still learning the basics of good
marksmanship. But once you master the mechanics, you need to know the
science of measuring accuracy. MOA or minute of angle is the most
popular (compared to MIL reticles) and it can be used to calculate
bullet drop, wind shift, the accuracy of a firearm, and most
importantly, how to zero and adjust scopes
and optics. Let’s break it all down. We’ll explain the math, then we’ll
provide plenty of examples for zeroing, hold-overs, and turret
adjustments.
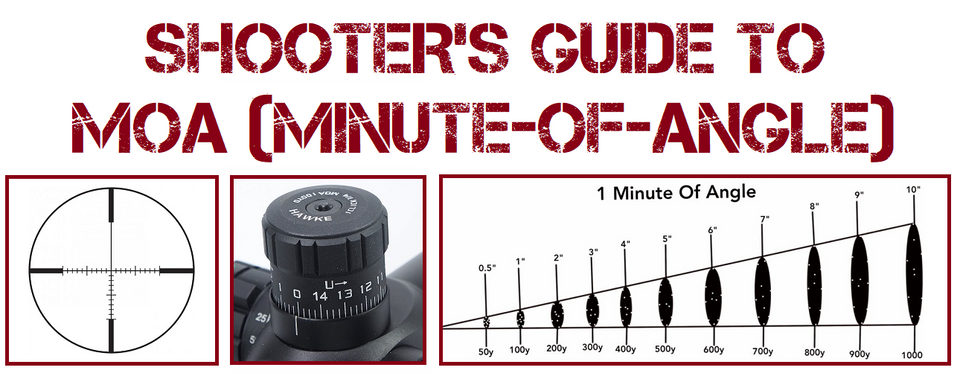
Minute of Angle (MOA) Defined
Minute of
angle is an angular measurement that increases in height (or width) as
distance increases. Think of the minute of angle as an imaginary cone
that widens as it gets longer. The tip of that cone begins at the end of
your muzzle. The base of the cone, a circle, rests at your target, or
where your bullet impacts. Any point along the cone, including its
circular base, is where the minute of angle can be measured.
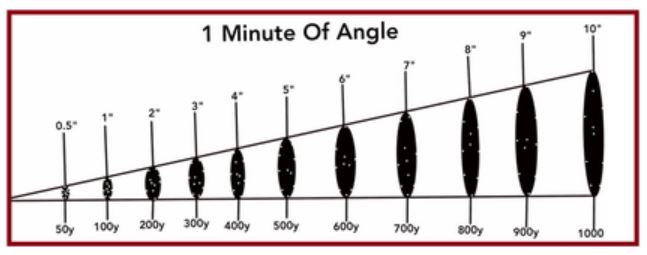
Confused?
Visualize this: If you extend your arms straight out and point one arm
up and one arm down (or left and right), you’ll notice your elbows are
closer together than your hands. The farther apart you point your arms
away from each other, the greater your MOA reticles. The closer your
arms are together, the smaller the minute of angle.
“How does MOA apply to shooting?”
- MOA reticle expresses how to dial in a scope or optic. Click 0.5 MOA left, and 1 MOA up.
- MOA rates how accurate a firearm generally is. It grouped 4″ at 200 yards, so its accuracy is 2 MOA.
We’ll learn how to convert MOA reticles into inches shortly. But
let’s explain why we use minute of angle instead of inches, first.
“What’s the benefit of using MOA?”
When some shooters discuss
shot placement, accuracy, or adjusting their scopes, they often refer to
inches. “I had a 5-inch group at 300 yards,” Or, “You need to come up 1
inch and left 2 inches.” Except trying to make adjustments with inches
means those adjustments are only applicable at that shooting distance.
For
example, if your rifle hits 1″ below the bullseye at 100 yards, you can
only do a moa scope adjustment 1″ up at 100 yards. That doesn’t mean
you’ll continue to hit 1″ low at 200 or 300 yards, so you can’t expect
that 1″ adjustment to hold true at other distances. And if you adjust
your scope, say, 1 inch up and 2 inches left at 50 yards to zero, you
won’t hit that same spot you were aiming at when shooting at greater
distances. More r adjustments will be necessary.
MOA allows you to express accuracy at any distance.
Let’s
pretend we have a highly accurate moa scope. At 100 yards, it maintains
a 1″ shot group. At 200 yards, it can produce a 2″ shot group. At 300
yards it manages 3″ and so on. But if we want to express this accuracy,
we can’t just say, “This rifle manages 1″ groups at 100 yards!” That
doesn’t necessarily mean it manages 2” at 200 yards and so on. How do we
express that it does, in fact, manage these tight groupings at various
distances? We say, “This rifle manages 1 MOA reticle groupings.”
Declaring its accuracy with minutes of angle covers all distances. By
saying it shoots 1 MOA reticle, we can quickly convert that back into
inches to estimate what kind of accuracy that rifle scopes will provide
at, say, 50 yards (0.5 MOA reticles) or 400 yards (4 MOA reticles).
MOA allows us to make adjustments for almost any distance without wasting ammo.
If
we know a rifle holds a particular minute of angle, we can quickly
estimate the required adjustments for any distance—wind and the
shooter’s ability notwithstanding. For example, if we hit 1″ low at 100
yards, we need to dial up 1 MOA. Two inches low at 200 yards means
dialing it up 1 MOA. Three inches low at 300 yards means dialing it up 1
MOA. The adjustment stays the same, because the ratio between point of
aim, point of impact, and distance remains the same.
Beginning to
see how that translates into adjusting your scope or reticle? Let’s
learn the math next. We use MOA-adjustment scope to illustrate how we’d
zero it just one time at a known distance. Doing this will allow us to
make the necessary adjustments to hit the bullseye at any other
distance.
How to Calculate and Use MOA (Easy Math!)
- MOA (Accuracy) = Distance between two points of impact (inches) divided by [Distance in yards / 100].
- MOA
(To zero or match POA and POI) = Distance between point of impact and
point of aim (inches) divided by [Distance in yards / 100].
General Accuracy Examples
- Example #1: You made a 0.75″ shot group at 200 yards.
- Calculation #1: 0.75 / (200 / 100) = 0.75 / 2 = 0.38 MOA.
- Example #2: You made a 1″ shot group at 200 yards.
- Calculation #2: 1 / (200 / 100) = 1 / 2 = 0.5 MOA.
- Example #3: You made a 5″ shot group at 425 yards.
- Calculation #3: 5 / (425 / 100) = 5 / 4.25 = 1.17 MOA.
MOA Reticle Adjustments-to-Zero Example
- Example #1: You’re zeroing a new scope and rifle for the
first time. You’re shooting at a target at 50 yards. You aim at the
bullseye and hit 2″ low, and 4.5″ left. - Calculation #1 (vertical adjustment): 2 / (50 / 100) = 2 / 0.5 = Adjust 4 MOA up.
- Calculation #2 (horizontal adjustment): 4.5 / (50 / 100) = 4.5 / 0.5 = Adjust 9 MOA left.
- Example
#2: You’re zeroing a new handgun with an MOA-adjustable red dot. You’re
shooting at a target at 25 yards. You aim at the bullseye and hit 4″
high, and 6″ right. - Calculation #1 (vertical adjustment): 4 / (25 / 100) = 4 / 0.25 = Adjust 16 MOA down.
- Calculation #2 (horizontal adjustment): 6 / (25 / 100) = 6 / 0.25 = Adjust 24 MOA left.
Use MOA Reticle (Hold Over)
Many rifle scopes
contain “hold-over” marks or tick marks that measure MOA reticle
vertically and horizontally. These hold-over marks rest on the reticle
itself, allowing the shooter to compensate for bullet drop and drift
(left or right) at any known distance, without having to make any
adjustments to the scope’s turrets.
Below is an example of how to utilize MOA hold over marks:
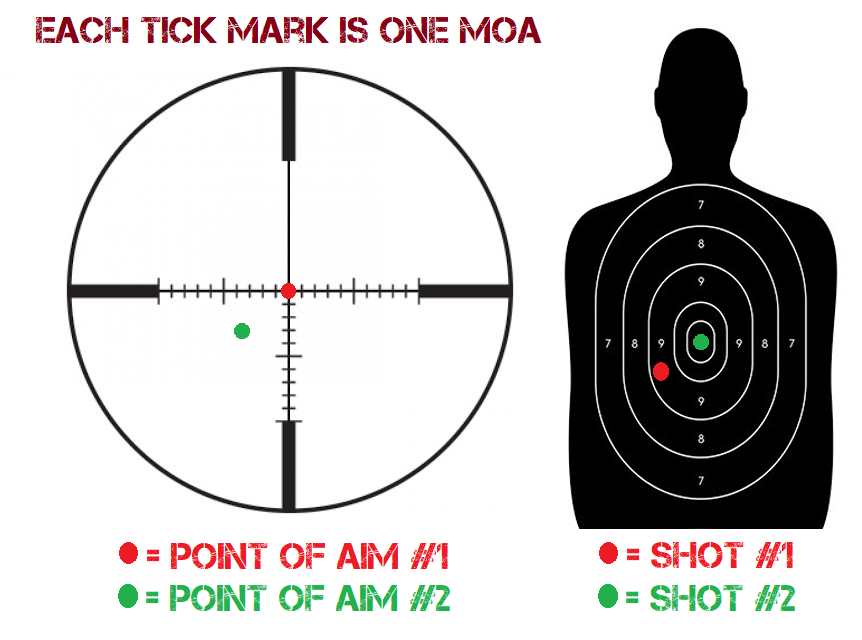
Shot
#1 is aimed at the center-mass of the target, assuming the scope and
rifle are properly zeroed. Given environmental factors (wind) and
distance, the point of impact is low 3 MOA and left 4 MOA. To
compensate, the reticle provides the hold-over marks to measure the
correction. Shot #2 hits center-mass because the reticle allowed the
shooter to compensate for wind and distance by aiming 3 MOA high, and 4
MOA right.
IMPORTANT! Second-focal-plane, or SFP scopes (scopes
where the size of the reticle remains the same regardless of
magnification) will only provide accurate hold-overs at a set
magnification, usually the highest magnification.
First-focal-plane,
or FFP scopes’ reticles get bigger and smaller with magnification.
While difficult to see at low power, hold-over marks can be used at any
magnification with an FFP scope only.
How to Zero and Adjust MOA Turrets
MOA reticles utilize minute-of-angle tick marks on the elevation and
windage turrets to zero your rifle and make adjustments to compensate
for changes in distance and wind downrange.
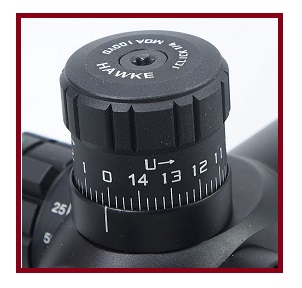
MOA
reticles utilize minute-of-angle tick marks on the elevation and
windage turrets to zero your rifle and make adjustments to compensate
for changes in distance and wind downrange. Nearly all MOA turrets use
1/4 clicks. That means every 4th tick mark represents one MOA of
adjustment. These “full MOA” tick marks are usually longer and numbered,
like the hour marks on a clock. Each small tick mark or individual
“click” of the turret is one-quarter of an MOA’s worth of adjustment.
For example, adjusting 4 MOA would require 16 clicks on a 1/4-MOA
turret. Using the math we’ve learned above, and how MOA translates into
inches at various distances, we can see how to easily zero a scope at
any known distance based on point of impact when aiming center-mass, or
bullseye.
“UP/DOWN” and “LEFT/RIGHT” Turret Markings
All
turrets have arrows or UP/DOWN and LEFT/RIGHT markings. These markings
indicate where you want to move your point of impact. That means if you
hit low and need to adjust higher, you click the turret in the “UP”
direction. If you hit left and need to shift point of impact right, you
move in the “RIGHT” direction. The opposite is true when moving DOWN and
LEFT. Simply put, click in the direction you want your POI to shift.
MOA Turret Zero Example
You’re
zeroing at 50 yards, aiming center-mass. You measure your 3-shot group
and find that it averages a point of impact that is 3″ low and 2.5″
right of the bullseye.
The Math: 3 / (50/100) = 3 / 0.5 = 6 MOA low. 2.5 / (50/100) = 2.5 / 0.5 = 5 MOA right.
The Turrets: With quarter-click turrets (4 clicks per MOA), multiply each point of impact MOA spotting by 4.
The Adjustments: 6 MOA x 4 = 24 clicks UP. 5 MOA x 4 = 20 clicks LEFT.
MOA Adjustment by Spotting Point of Impact
This
example assumes you do not have hold-over markings in your reticle, so
you need to adjust the scope itself to hit the intended point of impact.
Your rifle is zeroed and you’re now aiming center-mass on a target 600
yards away. You fire, and spot your round impacting 8″ low and 5″ left.
Your turrets are quarter-click MOA adjustments.
The Math: 8 / (600/100) = 8 / 6 = 1.33 MOA low. 5 / (600/100) = 5 / 6 = 0.83 MOA left.
The Adjustments: 1.33 x 4 = 5.3 clicks UP. 0.8 x 4 = 3.3 clicks RIGHT.
Obviously, you can’t make 0.3 clicks on your turrets, so round down to 5 clicks UP, 3 clicks RIGHT.
MOA Adjustment for Distance and Bullet Drop With Ballistics Data
In
this example, if you have a hold-over reticle, you can simply use MOA
markings in your scope to compensate for bullet drop at known distances.
If not, you can make the necessary turret adjustments. For this
example, you’re shooting 150-grain .308 Winchester Federal ammunition at
a target 300 yards away. With ballistics data, you know this particular
bullet drops 13.5″ at 300 yards.
The Math: 13.5 / (300/100) = 13.5 / 3 = Anticipated 4.5 MOA drop from bullseye.
The
Hold-Over: Using the vertical hold-over marks in your reticle, aim
center-mess of the target between the 4th and 5th bottom tick marks.
Or…
The
Adjustment: With a quarter-click scope with no hold-overs, adjust the
elevation turret 18 clicks UP (4.5 x 4 clicks per 1 MOA)
Summary & Quick Tips
We covered a lot of information, so here’s the important stuff, short and sweet:
- Calculate MOA by dividing POI (inches from bullseye) by [distance to target in yards / 100].
- Calculate MOA accuracy by diving size of shot group in inches by (distance to target in yards / 100).
- Adjust turrets in the direction you want to move your point of impact. Hit left, click right. Hit low, click up.
- If
your turrets are quarter-MOA adjustments, multiply the MOA required by
4. Example, adjusting 6 MOA up would require 24 clicks on elevation
turret in “UP” direction. - SFP scope hold-over can only be used at one magnification, usually the highest.
- FFP scope hold-over marks can be used with any level of magnification.
Shop the parts: rifle scopes · optics